 A photo of our living room through our French doors. I have added some pieces in here over the last week and I will show you more images soon. You would notice I don't have a rug down...there is a reason, actually 2 little ones! Through the Summer months I decided it was so much easier to take up our jute rug while the boys are running in and out of these doors covered in grass and the like. It makes it a breeze just to sweep up at the end of each day because the boys run in and out of these doors and carry in bits of everything!
I don't think I have ever showed this view of our living space before. You can see how it works with the kitchen and dining space (I must sort that 'BLOOM' sign out, always moves). I did add the big wicker trunk to the side of the sofa which I am loving...anyway, bathroom floor update....
 Mic was away for work all weekend, and while he was gone I pulled up the lino to discover lovely Tasmanian Hardwood floorboards like the rest of our house, and they are in fairly good condition. There was a patch though that had really old newsprint on it. I tried to take a detailed shot for you...you may be able to make out the print! Well I sat for hours with a chisel, scrapping this stuff off!!
 This is what it all looks like this morning.
 Mic was away for work all weekend, and while he was gone I pulled up the lino to discover lovely Tasmanian Hardwood floorboards like the rest of our house, and they are in fairly good condition. There was a patch though that had really old newsprint on it. I tried to take a detailed shot for you...you may be able to make out the print! Well I sat for hours with a chisel, scrapping this stuff off!!
 This is what it all looks like this morning.
I wont be able to do anything in here much this week as I have lots on with other jobs, but I will be hoping to get some gaping etc done on the weekend ready for a coat of BIN primer as there are some old stains here and there that will bleed through my top coat if I don't seal them properly. I am happy to leave them raw for now.
Hope you have a lovely day.
Ness xx
 Seeing I am in renovation mode again, I thought I would show you the evolution of this room...how it came about and what it ended up as.
  We had to fill between all of the beaded ceiling grooves, repaint, put up new cornice to suit the era, added picture rail and chair rail and high skirting's.
 Dad set to work building the new fireplace surround to protect the old bricks. Previous owners had really done a job on the fireplace and we had to render the bottom just to stop it falling apart and to make it look nicer.
 I painted this 1 meter x 1 meter canvas to become the main focal point of the room....
 ...while I was 8 1/2 months pregnant with Mason! As you have probably guessed by now we were doing his bedroom/nursery. This was taken the day we brought him home.
 We had to re carpet (obviously) and I painted the room Chalk USA as I wanted the toys and the canvas to be the main colours in the room. At the time we had balloon curtains in the window and side drapes were added. There is now wicker roman blinds.
 ...at this point we still hadn't finished the fireplace. The bespoke corbels had gone on and the bricks and render painted the same as our other fireplaces, but the detail was still being sorted.


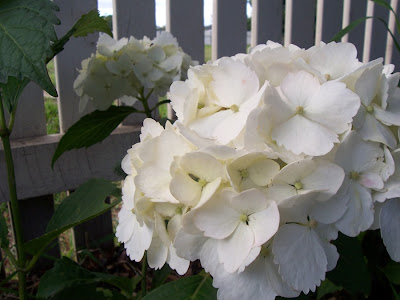 My beloved Hydrangeas are in there last stages of beauty, before they turn into brown sticks for the Winter. I am going to have to cut some to savour them over the cold months.
 This is the first year that this particular one was the colour it said on the tag!
 I am looking for some designs that will kick off our garden. We don't have any pathways yet. I don't like hard concrete, but would settle for something that included grass in it like this, in a more random layout. We will have box hedges everywhere as well.
 Maybe some paving for extra seating areas and a kids play space...with Hydrangeas of course
 ...but I will be happy to turn our dusty patch beside our veranda into a lush oasis that is filled with one of Dads' birdhouses on a pole, loads of box hedging, Agapanthas, a seating area, and ...Hydrangeas! What do you think?
 As you may know we are in the thick of renovating our home. We have planned to put in French doors where all of these windows are and a veranda along this side of the house since we moved in nearly 6 years ago. The last window will be a double door. I have been planning this for some time and finally settled on the working drawing to show to Builders etc, I thought you might like to see....
 I had to take this with our camera as it wouldn't scan!
 This is what I had planned for inside where the double French doors will be, the living room our the back of the house. It has changed slightly since this was sketched (furniture arrangement I mean), but you can see what we wanted to do with dressing the doors.
 This is a job I am working on at the moment which is by the Ocean.
 The plan here is to bag the outside in a light Latte colour with Charcoal accents (not black). Get rid of Mt Everest stairs and make a main entrance on the first level with beautiful double doors. The top floor will become a balcony to enjoy the sea views. Eventually new windows will be put in and the Garage doors replaced and a beach/ coastal inspired garden will be added.
 As you can see we had a beautiful day to do...you guessed more painting!
 I have had loads of emails about how I done my little $5 sideboard. So here is what I done...
 This is the side of our poor home today. Mic and his Brother started filling all of the cracks etc in the wood in preparation for painting. This is also the side of the house that will eventually have a 2meter deep veranda and french doors will replace all of the windows you see here.
 This is the horrid colour we have lived with for nearly 6 years while we concentrated our efforts on the inside. It is a funny tan/pink/salmon colour with burgundy trim...I don't care for it!
 This is the beautiful colour it will become. I tried the sample pots around the back door, as Mic is a very visual being and needs to see before he will believe. The main walls are 'Warm White', the Architraves and window frames are 'Antique White USA', and the trims and front and back doors (including fly screens) are 'Woodland Grey'. I love it and think it really makes a feature of our rough sawn boards.
 Now, here is my $5 sideboard as you last saw it...remember it was on it's way to the tip and had been out in the rain for about a week or so before I snapped it up...
 Well this is it now. Still in the garage so not the best lighting in there, but I hope you all get the idea. When I took this photo today I was just getting the new catch on the left door.
 I replaced the handles with these beautiful antique copper finish pulls on the drawers and matching small door pulls on the doors.
 I was going to just paint it all white, but when I had done that you could see a lot of the bits that were beyond repair, so I thought I would use that to my advantage and got some stain and ran over it all with a rag, concentrating it on the edges and then going over the middle of each panel with more white to give it a sort of French wash. I then sanded the edges (just a little) to make it seem old, which it is...and voila! New sideboard for our Kitchen. I can't move it in until I have finished painting the walls white. Then I will show you it dressed. Please tell me what you think of it all.